解压打包
1. 格式:
2. 操作:
Stream
stdin stdout stderr pipe
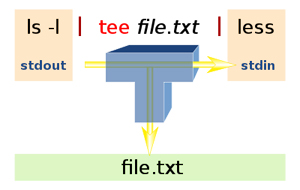
文件描述符 管道 重定向- echo takes a string and puts it on stdout
- “>” 创建/覆盖写入文件,“>>“创建/追加写入文件, 这是stdout重定向到文件的pipe
$ some_command 2>stderr.log 1>stdout.log # 1> 等同于 >
$ some_command &>stdout_stderr.log # stdout stderr 同时流向一个文件
$ some_command 2>/dev/null # 流向黑洞

# tee截取stdout流不仅在屏幕上显示,并同时写到log1和log2
$ ls -l|tee log1 log2

# Pipe(``)
$ git rm `git status|grep deleted|awk '{print $2}'`
$ for i in `ls | grep xxx`;do mv -f $i "front"$i;done # 批量重命名文件
# Pipe(|) 批量杀进程
$ ps aux|grep 'php\s-f'|awk '{print $2}'|xargs kill -9
$ pgrep 'php\s-f'|xargs kill -9 # 同上,pgrep直接筛出进程ID数组
$ grep foo bar.txt 优于 cat bar.txt|grep foo # 后者已将内容发到标准输出作为grep 标准输入
$ f src deep\/ | xargs grep -L scoped # 不包含scoped的列表,包含的列表用-l
cut 和 uniq
cut 用来按指定字符来split 每行的数据,假如我们要看日志中每行的IP, IP是从头部到第一个空格' '之间的内容uniq用来去重
tail -f 内容会随着持续的用户访问数据的不断写入而动态变化
$ tail -f /var/log/httpd/access_log | cut -d ' ' -f1 | uniq
223.104.25.79
38.99.82.191
wc
wc -l 显示行数(--lines)
$ f . 温馨提示 | wc -l
ln
$ ln -s /git/h.markbuild.io/ /markbuild/blog/ && mv h.markbuild.io h
dd
$ dd if=inputFilepath of=outputFilepath [bs=blocksize count=总共要复制的数据块个数] # dd(device driver)
$ dd bs=9 skip=1 if=428326347-1-30080.m4s of=428326347-1-30080.mp4 # 去掉文件的前9个字节(按blocksize=9切片,跳过第1片)
# 洗盘
$ dd if=/dev/urandom of=/dev/sda bs=4096 # /dev/zero 像/dev/null 一样是个伪文件,实际产生连续不断的二进制零流
$ dd if=/dev/zero of=/dev/sda bs=4096 # /dev/urandom 提供永不为空的随机字节数据流
$ mkfile -n 20M ~/Download/20M.pdf # 创建指定大小二进制零流文件
Resource
Mac: 活动监视器 Win: 任务管理器
$ top # 各进程资源占用状况
$ top -o %MEM # 内存占用状况
$ ps auxw # 进程状态查看
$ free -m # Memory usage
$ df -h # Disk Free
$ du -h # Disk usage (明细)
$ du -sh # Disk usage (汇总)
系统信息
$ cal -3 # 日历 -y 整年
$ who # 哪些账号登录了系统
$ whoami # 当前哪个账号
$ uname -a # 查看内核配置,系统架构(x86_64)
$ locale # en_US.UTF-8
$ sudo ln -sf /usr/share/zoneinfo/Asia/Hong_Kong /etc/localtime && date # HK Time
$ cat /etc/system-release # CentOS Linux release 8.4.2105
$ nginx -v # Nginx Version
$ mysql -V # MySQL Version
$ php-fpm -v # PHP Version
Network
curl
$ curl -v -H "Range: bytes=0-0" https://wordpress.org/latest.tar.gz

-H: 指定request header参数
-i: Show Response Headers
-v: Show handshake + Request & Response Headers
更多参考F12 > Network > Copy as curl
sftp
$ sftp sftp@host
sftp> cd /data
sftp> ls
sftp> get portal_0909.zip # 从ftp下载到本地
sftp> lpwd # 显示本地当前路径
sftp> put README.html # 从本地上传到ftp
cp/sh/scp/ssh
$ cp -r dir1 dir2 targetdir
$ scp -r gulp-cdn/css gulp-cdn/img gulp-cdn/js root@172.16.40.11:/data/targetdir
$ scp root@172.16.40.9:/srv/file.tar.gz targetdir
$ sh task.sh
$ ssh root@$ip  "rm -rf /data/css /data/img /data/js ; mv a b"
$ ssh -i "~/.ssh/id_xxx" root@$ip $cmd
本机Listen的Port
$ netstat -ano win
$ netstat -lntp Linux
$ netstat -AaLlnW Mac
Port查PID
$ sudo lsof -i:{port} # Mac/Linux
$ netstat -ano -p tcp|findstr {port} # Win
PID查所属程序
$ ps -ef|grep {pid} # Mac
$ tasklist |findstr {pid} # Win
连接IP
$ ping {ip|domain}
连接Port
$ telnet {ip|domain} {port}
ARP
将IP地址转化成物理地址的协议# Win Mac Linux $ arp -a # 可以查看arp缓存表的内容了 $ arp -d # 可以删除arp缓存表里的所有内容 $ arp -s # 可以手动在arp表中指定ip地址与mac地址的对应关系ARP欺骗
第一种ARP欺骗的原理是——截获网关数据。它通知路由器一系列错误的内网MAC地址,并按照一定的频率不断进行,使真实的地址信息无法通过更新保存在路由器中,结果路由器的所有数据只能发送给错误的MAC地址,造成正常PC无法收到信息
第二种ARP欺骗的原理是——伪造网关。它的原理是建立假网关,让被它欺骗的PC向用错误的MAC地址假网关(告诉它192.168.1.1网关的MAC址=我的MAC地址)发数据,而不是通过正常的路由器途径上网。在PC看来,就是上不了网了,网络掉线了
MAC泛洪: 交换机mac表的空间有限,当mac表存满了mac地址的时候会报错,并且进入非正常状态,在这个状态交换机工作的时候会把接受的信息用广播的形式发出去,这样就可以用抓包工具把广播的信息抓到
DNS
$ nslookup markbuild.com
$ whois markbuild.com # Mac
$ dig -x 184.168.58.103 # Mac查询DNS缓存
$ ipconfig /displaydns # Win
Miscrosoft 查看缓存的文档
Hosts file and can be found at C:\Windows\System32\Drivers\Etc. Any entry in this file is automatically preloaded into the DNS resolver cache.
不确定Mac OS 是否会预加载到缓存
Linux的配置文件/etc/nsswitch.conf 可以设置DNS和hosts文件的优先级,先去查DNS服务器还是hosts解析行为:默认如下
hosts: files dns myhostname # files 指的就是/etc/hosts文件
Shell Script
*source* run script in current shell, source可以简写为"."
*bash* run script in a subshell
Shebang
#!/bin/bash
#!/bin/bash -xv #调试模式
Linux环境下的任何脚本语言,都是以这样一个被称为**Shebang**的特殊行作为起始的。( # 在Unix行话里常读成sharp或hash(有时候是mesh),! 读bang)
/bin/bash 是Bash(Bourne Again Shell)的路径,你也可以用/bin/sh
$ cat /etc/shells
$ chsh -s /bin/zsh # Change Default Shell to zsh
$ echo $SHELL
在Linux下Python/PHP 脚本文件也是有这么一个shebang头
#!/usr/bin/env python3
#!/usr/bin/env php
脚本调试
$ set -x # 开启把它下面的命令打印到屏幕
$ set +x # 关闭
运行脚本的两种方式
1.将脚本作为命令行**参数**的运行方式, 此时脚本中的shebang行也就没有什么用处了
$ sh backupdb.sh
2.将脚本作为**具有执行权限**的可执行文件
$ cat script.sh
#!/bin/bash
echo "hi,mark"
$ ./script.sh
-bash: ./script.sh: Permission denied
$ chmod a+x script.sh
$ ./script.sh
hi,mark
$ /home/yourname/script.sh # 完整路径
hi,mark
命令类型
$ type ls # executable file
ls is /bin/ls
$ type gcc
gcc is /usr/bin/gcc
$ type cd # shell built-in function
cd is a shell builtin
$ type la # alias
la is an alias for ls -al
crontab
$ crontab -e # Edit your crontab file
$ crontab -l # Display your crontab file
$ sudo service crond restart
4 1 * * * bash ~/backupdb.sh >>~/log/cron.log
| Category | Value | Description |
|---|---|---|
| minute | 0-59 | This controls what minute of the hour the command will run on. */5 Every 5 minute |
| hour | 0-23 | This controls what hour the command will run on. |
| day | 1-31 | This is the Day of Month, that you want the command run on. |
| month | 1-12 | This is the month a specified command will run on. |
| weekday | 0-6 | This is the Day of Week that you want a command to be run on. |
nohup
$ nohup wget -i download.txt
nohup: ignoring input and appending output to 'nohup.out'
$ ls
download.txt 2017-06-12-16-26-42_58.jpg 2017-06-12-16-40-47_40.jpg nohup.out
Windows Batch
start explorer ftp://{{ encodeURIComponent(ftpuser).replace(/%/g, '%%') || 'username' }}:{{ encodeURIComponent(ftppwd) || 'password' }}@{{ ftpurl || '14.23.45.67:65521' }}/
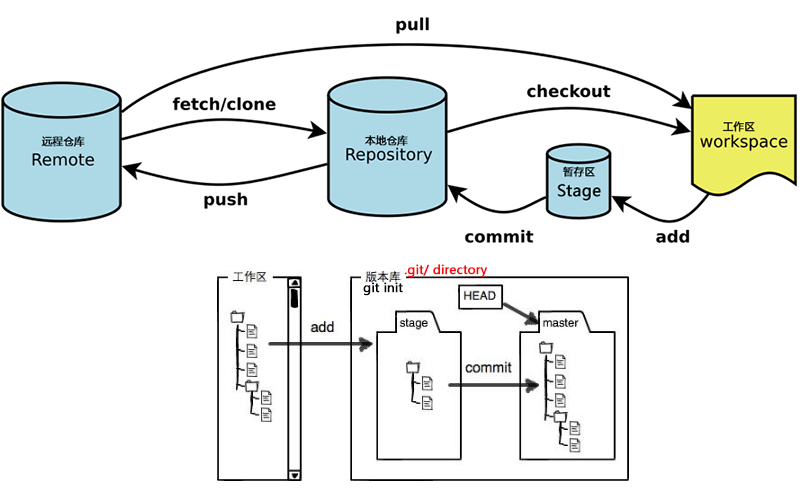
Git
Config
$ git config --global user.name "markbuild"
$ git config --global user.email mark@mail.com
# 这样会生成一个配置文件:~/.gitconfig
# 查看 git config user.email
$ git config --global core.ignorecase false
https://github.com/settings/tokens
$ git config --global credential.helper store
# 这样会生成一个配置文件:~/.git-credentials 保存token
git revert 将某个commit提交的代码做逆向操作,添加了代码则删除,删除了代码则添加。会产生一个新的commit2。如果再执行git revert commit2,则会继续增加和删除相应的代码。
git rebase 创建线性的提交历史,看起来像是按顺序开发的, 会重写提交历史,改变提交的哈希值, 让项目历史更加整洁,但会丢失分支合并的上下文信息,适合各人项目
git cherry-pick B002 将某个分支上的单个提交B002应用到当前分支
仓库
$ git init  # 初始化仓库
$ rm .git  # 删除仓库
$ git add .  # copy workspace stage
$ git checkout .  # copy stage workspace
$ git reset .  # unstage(reset stage)
$ git rm --cached [file]  # untrack
$ git rm `git status|grep deleted|awk '{print $2}'`   # 'git rm' all deleted files shown by 'git status'
$ git reset --soft HEAD^  # 撤销commit
$ git reset --soft HEAD~2  # 撤销2次commit
$ git reset --soft [commit]  # 撤销到指定commit
$ git stash save/apply/drop # 缓工作区
分支
$ git branch  # 列出所有分支
$ git branch -r  # 列出所有远程分支
$ git checkout -b feature_x # 新建一个分支feature_x并切换到feature_x分支
$ git branch feature_x [commit]  # 基于指定commit新建一个分支feature_x
$ git checkout feature_x # 切换分支 更新工作区
$ git checkout - # 切换到上一分支, 类似于cd -
$ git branch --set-upstream-to=origin/feature_x # 关联远程分支,否则每次git push时都要指定远程分支
$ git merge origin/master  # 合并远程主干分支到当前分支
$ git merge -  # 合并上一个checkout的分支到当前分支

$ git branch -d feature_x  # 删除feature_x分支
$ git push origin --delete feature_x  # 删除远程分支

$ git checkout test; git reset --hard origin/master; git push --force # 重置当前分支为master分支
比较
$ git diff master   # 当前分支与master分支对比
$ git diff master --stat   # 仅显示不同的文件名
$ git diff master src/App.vue   # 当前分支与master分支比较src/App.vue这个文件
$ git diff origin/master --stat src   # 当前分支与远程master分支比较src目录
$ git show [commit]  # 查看某次commit的文件变化对比
替换
$ git checkout master public/people/echarts-4.3.0.min.js   # 将主分支上文件替换当前分支
$ git checkout [commit] [filepath]   # 替换指定commit的文件
Origin
$ git remote add origin2 master  # 本地仓库和远程仓库建立连接
$ git remote set-url origin2 http://x.com/x.git # 设置远程仓库URL
$ git remote # 查看远程仓库
$ git remote -v # 查看远程仓库
$ git push origin2
$ git checkout -b newbranch origin/oldbranch  # 基于远程oldbranch创建newbranch
svn
$ svn checkout
$ svn update
$ svn add dir
$ svn commit -m "ud"
$ svn revert -R .
npm
$ npm config list   查看配置
$ npm cache clean --force 清缓存
brew
$ brew services list   查看服务列表
$ brew reinstall mysql 重装mysql
$ brew services start mysql  启动服务